Looking for Information on a Specific Part Number?
Cortron Parts are typically formatted in an NNN-NNNN or NNN-NNNNx format.
CORTRON GENERAL KEYBOARD & TRACKBALL CLEANING RECOMMENDATIONS
KEYBOARDS
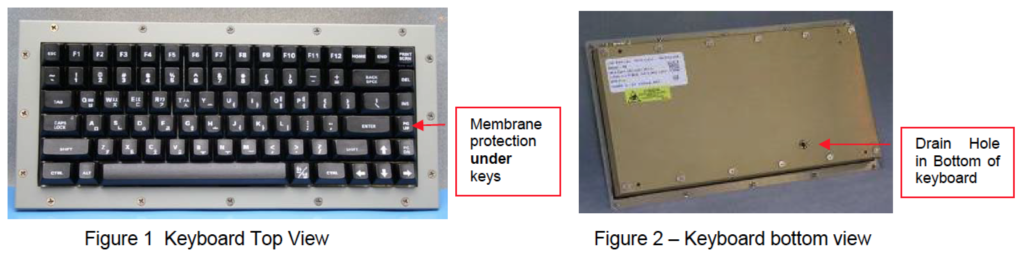
All Cortron Rugged and most Cortron Industrial grade keyboards include an integral seal underneath the keys and typically include an integral drain for removal of rain or liquids. For cleaning of the keys and keyboard surfaces, the Cortron factory uses cloth moistened with rubbing alcohol (or isopropyl alcohol, 70-100%) for cleaning new and used keyboards. A soft bristle brush moistened with alcohol is very effective removing built up dirt or grime. Note: Customers should avoid harsh cleaning solutions and solvents such as Acetone or Ketone family of solvents. Most Cortron products will not become damaged from harsh solvents if exposure is limited to short durations – simply rinse the keyboard off thoroughly with water if exposed to such chemicals. Cortron keyboards can alternately be cleaned with most commercial non-abrasive cleaners, such as: Windex, Fantastic, or soap and water.
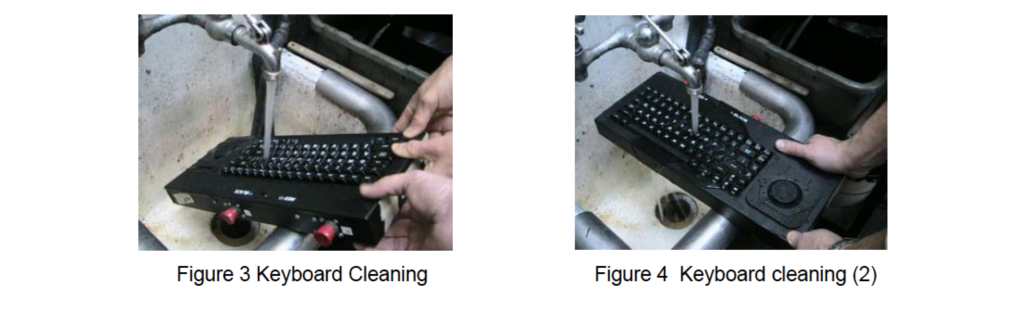
For large amounts of sand, dust or debris, simply turn the keyboard over and shake the debris out, or rinse under faucet as pictured below.For dried beverages or other sticky substances, a warm/hot water rinse under a faucet will help dissolve dried residual spill materials. This cleaning approach will also help dissolve food or other substances from key cavity. When performing faucet cleaning, be sure to avoid connectors on bottom/side enclosure openings for drainage, optional switches, and extra connectors when applicable. Most Cortron keyboards are very well sealed, however we manufacture a variety of different ‘grades’ of products, so each user is suggested to use their best judgment as to where water / cleaning solutions should be sprayed. The best approach for sink cleaning is to have the keyboard at an angle with the spacebar at the lowest point, washing in a downward flow. After washing, dry off keyboard and be sure connectors are dry before making electrical connection. As an extra safety precaution, shake keyboard to be sure water did not penetrate assembly. If water did penetrate assembly, let unit dry out before making electrical connection.
CLEANING INSTRUCTIONS – TRACKBALLS
Ball sizes: 1⅜”, 1½”, 2” and 2½”
Preface: The trackball assembly components may require cleaning if ball cursor movement does not track properly. If cursor skips, does not move in certain directions, has excessive vibration or feels rough then check ball components for dirt build-up. Level of use and environmental conditions will dictate frequency of cleaning required. The ball wiper is designed to reduce the frequency of cleaning by continuously wiping the ball surface.
Note: Cortron trackballs do NOT have ESD sensitive components within ball cavity; therefore ESD handling precautions are NOT required for procedures shown here. Caution should still be taken with exposed connectors on the product.
Disassembly:
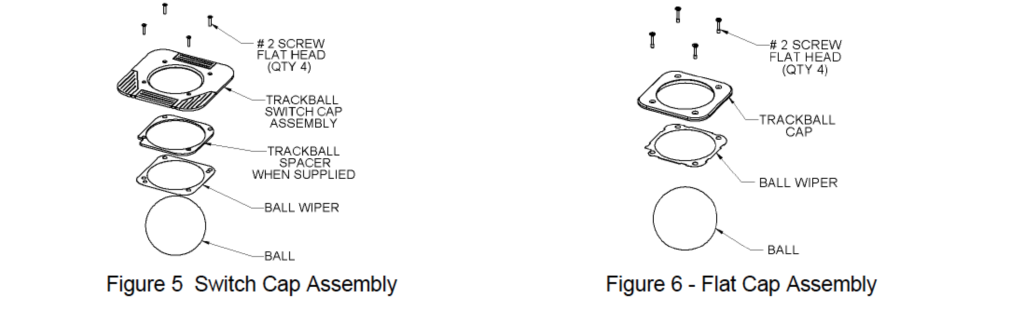
∗ Unscrew 4 trackball Switch Cap or Flat Cap retaining screws (#1 Phillips).
∗ Remove trackball Switch Cap or Flat Cap, ball wiper, and ball.
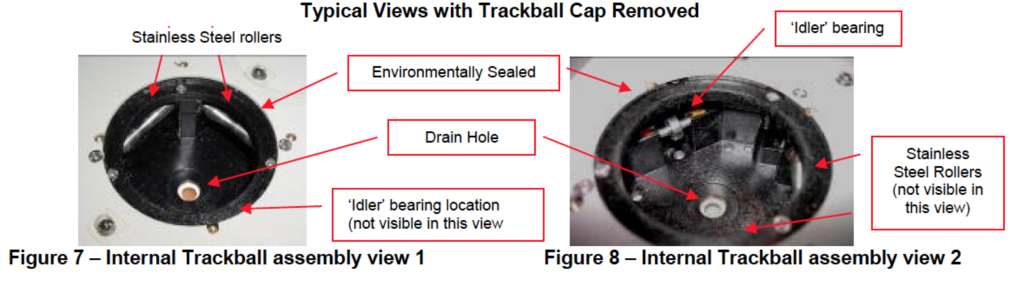
∗ Clean trackball Cap, ball wiper, ball, two steel rollers, and idler bearing by rubbing with clean cloth or scraping
with appropriate tool. Isopropyl alcohol (70-100%) on a swab or cloth may help remove caked or embedded dirt or sticky substances.
ASSEMBLY INSTRUCTIONS:
* Replace ball.
* Replace ball wiper with contour of seal matching contour of ball.
* Position trackball Cap over enclosure and align holes with threaded holes in enclosure.
Note: Switch Cap assembly has (4) brass inserts that are used for screw bushing and alignment improvements.
These inserts are located on underside of Switch Cap assembly out of normal view when mounted. Be sure that
all (4) brass inserts are in the Switch Cap (these brass inserts are pressed in place for ease in transport and
handling). The Flat Cap does not have these inserts.
* Secure with 4 screws. Tighten to ‘finger tight’ (approximate torque range of 8-10 inch ounces). Do not overtighten.
If you have any questions or need additional assistance please do not hesitate to contact Cortron.